Dairy Free Cream Cheese Mints (Gluten Free)
Dairy free cream cheese mints are a great way to make homemade allergy friendly candies and table mints for parties. Based on classic vintage cream cheese mints, our version is dairy free, vegan, and gluten free!Gluten free, dairy free, vegan
Servings 75 pieces
Calories 41kcal
Equipment
Ingredients
- 3.5 ounces (½ container) Violife cream cheese
- 1 Tablespoon dairy free butter (I used Country Crock homestyle dairy free butter)
- 1 teaspoon McCormick mint extract (or more if you like a stronger mint)
- ½ teaspoon vanilla
- Dash salt
- 5 ½ cups powdered sugar
- Natural food coloring
- White sugar for rolling
Instructions
- In a large bowl, add the dairy free cream cheese and beat it with a hand mixer until softened.3.5 ounces (½ container) Violife cream cheese
- Add in the dairy free butter, peppermint extract, vanilla, and salt, and mix again. The dash of salt helps enhance the flavors and cuts some of the sweetness.1 Tablespoon dairy free butter, 1 teaspoon McCormick mint extract, 1/2 teaspoon vanilla, Dash salt
- Mix the powdered sugar into the cream cheese in increments, about 1 cup at a time, mixing well each time, until the mixture resembles the texture of playdough. It should be easy to roll and shape, is no longer sticky, but doesn’t crack when you shape it. I ended up using 5 ½ cups of powdered sugar to get the consistency with the liquid food coloring I used as well. If you use a dry natural food coloring powder, it might take a little less powdered sugar.5 ½ cups powdered sugar, Natural food coloring
- I used my hand mixer to continue mixing everything as it got very thick, but you can knead it on a clean countertop as it gets thicker.
- You can taste test it here to see if you want to add more mint extract. I like the light mint flavor of these as-written, but if you want a stronger mint flavor, you can add a little more mint extract.
- If you are making different colors of mints, divide the mint dough into separate bowls, add natural food coloring, and mix until everything is blended and the color you desire. Cover each bowl with plastic wrap while working on the other bowls to keep the mint dough from drying out.
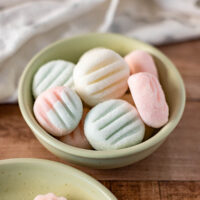
- Roll the mint dough into nickel or dime sized balls, roll them in white sugar, place them on a parchment paper lined sheet pan, and press a fork into the top of the mint.White sugar for rolling
- Or use silicone molds to create shapes by rolling the dough in sugar, then pressing into a silicone mold that is sprinkled with more sugar inside. Unmold gently and place them on the sheet pan.
- If you divided the dough into different batches to color them, cover the other bowls while shaping the mints to prevent the waiting dough from drying out too much before you shape the mints. If any of the dough starts to dry out while working with it, just knead it together until it’s no longer dry.
- Repeat until all the dough is used up and shaped. Put the sheet pan in the fridge, uncovered, to chill overnight to firm up the mints and let them dry out a bit on the outside to hold their shape.
- Once the mints are firm, they can be served chilled or at room temperature. Store any leftover mints in the fridge or freezer in an airtight bag or container. If they are frozen, just thaw them at room temperature for about 15-20 minutes before serving. They will thaw quickly since they are small.
Nutrition
Serving: 1mint | Calories: 41kcal | Carbohydrates: 10g | Protein: 0g | Fat: 0.4g | Saturated Fat: 0.3g | Polyunsaturated Fat: 0.01g | Monounsaturated Fat: 0.1g | Trans Fat: 0g | Sodium: 7mg | Potassium: 0.3mg | Sugar: 9g | Calcium: 0.1mg | Iron: 0.01mg
