If you have a ton of leftover hard candy from Halloween or from other holidays, take that candy and make some crafty DIY hard candy dishes with them!
Got candy?
Sometimes the holidays come and go, leaving behind a huge pile of candy. Candy is not a very good thing to keep around the house (especially for me!). Here is a good way to use all of the hard candy without adding a jeans size or giving your kids a sugar high.
I got this awesome idea from the Tutto Bella blog where they made serving trays fashioned out of starlight mint candies. I have used this idea before in the windows of my gingerbread house, but this was an excellent idea to make them into serving trays.
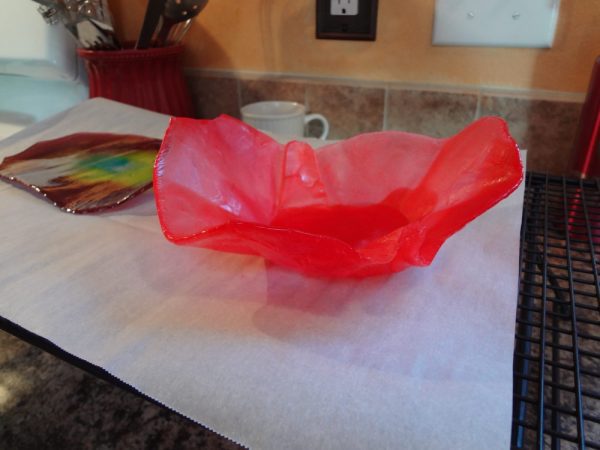
I took the advice of one of the blog’s commenters and shaped the candy into a bowl. How cool is that! You don’t even have to wash these when you are done using them, and you can give them away and not worry about getting them back.
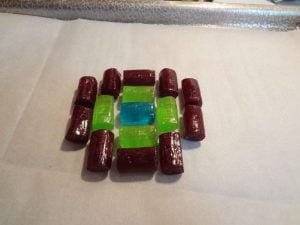
I didn’t have starlight candies around, so I used some Jolly Ranchers instead. You could also use some Life Savers or just about any hard candy, just be aware that the melting times may vary so keep an eye on them. I want to try candy canes sometime to see what they do : )

Arrange your candy how you like

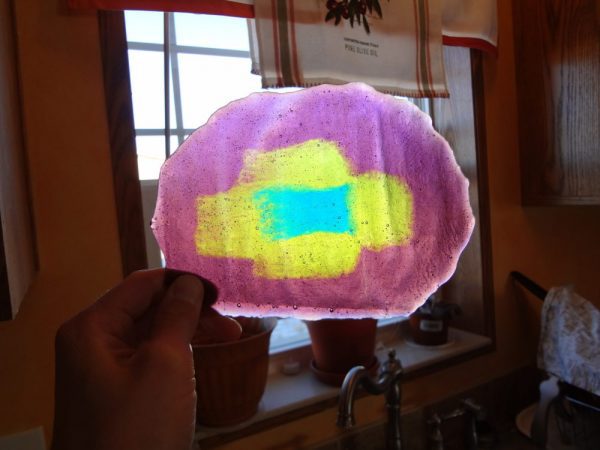
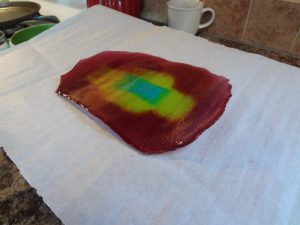
Once it’s melted, it will make a candy plate
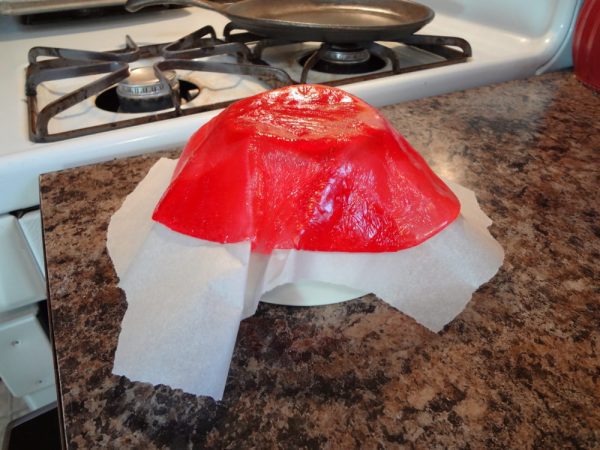
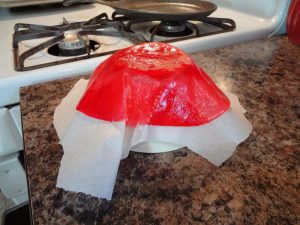
If you want a bowl, while the candy plate is still warm and pliable, press it around an inverted bowl to create a bowl shape and let it cool that way.
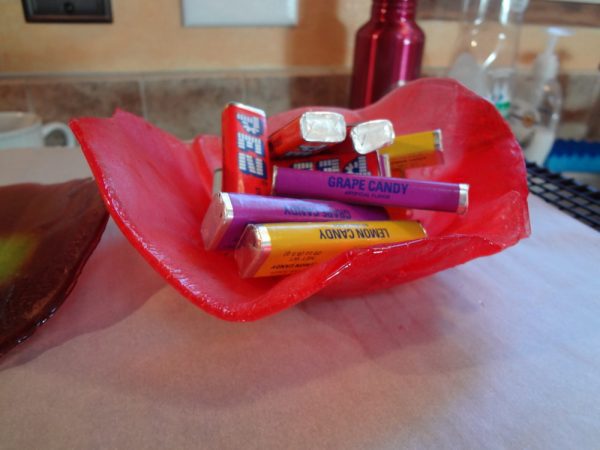
Try filling your bowl with something healthier than more candy! 😉
DIY Hard Candy Dishes
Adapted from Tutto Bella blog (the Tutto Bella blog is no longer up and running)
Instructions
- Preheat your oven to 350 degrees F. Line a baking pan with parchment paper.
- Arrange the candy in a colored pattern or shape of your choice on the parchment lined pan.
- Bake the candy in the oven between 5-10 minutes., depending on the type of candy. The Jolly Ranchers did best at 6-7 minutes.
- Take the candy out of the oven and let cool. If you want to make a bowl, let the candy cool some. When the candy has cooled a bit but is still pliable, press into a bowl (with the parchment still on the candy) or around the outside of a bowl. Let cool completely.
Here’s a printable card below!

DIY Hard Candy Dishes
Equipment and materials
- 1 bag hard candy of your choice (such as peppermints, Jolly Ranchers, etc. NOT chocolate covered)
- Cookie sheet
- Parchment paper
Equipment
- Cookie sheet
- Half sheet baking pan
- 1 bag of hard candy, like Jolly Ranchers or starlight mints
Instructions
- Preheat your oven to 350 degrees F. Line a baking pan with parchment paper.
- Arrange the candy in a colored pattern or shape of your choice on the parchment lined pan.

- Bake the candy in the oven between 5-10 minutes., depending on the type of candy. The Jolly Ranchers did best at 6-7 minutes.
- Take the candy out of the oven and let cool.
- If you want to make a bowl, let the candy cool some. When the candy has cooled a bit but is still pliable, press into a bowl (with the parchment still on the candy) or around the outside of a bowl. Let cool completely.
- Fill with your favorite treats!


Sarah Jane Parker is the founder, recipe creator, and photographer behind The Fit Cookie which she founded in 2011. Sarah is based in Wyoming and has been managing food allergies for herself and her 2 children for over 20 years. Sarah was also a certified personal trainer for 12 years, as well as a group fitness instructor, health coach, running coach, and fitness nutrition specialist.
is their a way to seal the candy bowl safely?
I think there are some food-safe clear sealers or paints out there that are food safe once they dry, like Mod Podge. I didn’t try sealing these at all when I made them so I’m not sure, but I bet Mod Podge would work
I need a platter to put an 8×8 cake on. I was thinking 10×10 and make a rim. What is the spread on jolly ranchers? Any idea on How many would I need?
It’s been awhile since I made these, but I’d say the Jolly Ranchers spread about double their size at least, so you’d want to get a couple bags of Jolly Ranchers and set them up to see how many you’d need to get the size you’re wanting. I’d also make sure that you don’t put your cake on it till shortly before you serve it since it might get sticky with a moist cake on top of it.
I used green & red striped starlight hard candy mints for Christmas bowls, put homemade candy cookies in them & covered it with red & green saran wrap bow. Wonderful gift. Thanks made my Christmas. Tami in Wyoming
That sounds beautiful Tami!
mine jolly roncher bowl is too sticky to do anything with it. very pretty but it has dried for two days and still sticky. A
Any help?
Hi! Sometimes the candy will be sticky if it’s old candy or if it is humid or has been exposed to moisture. You can try making it again with fresh candies, or you can spray a couple coats of clear lacquer on the dish to seal it. Let me know how it goes for you!
How far ahead can yu make them? Do they sticky after they are baked?
Hi Bette! You can make these as far ahead as needed, provided it is not super humid in your area. If you use a good hard candy that isn’t sticky, you shouldn’t have any problems. They will be sticky when hot, but the stickiness will go away as it cools. If you live in a very humid place, they will probably get sticky after a couple days. Also, I wouldn’t recommend putting anything moist in the dish or it will get sticky. You can always experiment and spray a clear coat of paint on the dish to seal it, just make sure it is food grade if you want to put treats in it.
This is such a cool idea!
Thanks for stopping by, Becki! I think I am going to make some next weekend for gifts : )
Sarah Jane-its Trish in Virginia again. Hope u had a nice Thanksgiving . I am going to
try the candy dish again today…I got starlight mints and butterscotch disc.
Im printing out your directions( this Page) so I do it right…LOL
I will do about 6 minutes at 350 degrees. I will let you know how Im doing.
You take care and Thanx again. Happy Holidays to you
Trish
Hi Trish! I hope you had a good Thanksgiving, too. Let me know how this turns out. I am glad you posted a comment again – it reminded me that I need to do this project with my kids again : )
Sarah-
You gotta see my bowl I made from starlight mints and butterscotch
disc. Im having so much fun since I mastered it. How can I send you
a pic….? Thank you so much………..
Trish
Awesome, I’m so glad it turned out! You can email me the photos here: thefitcookie(at)gmail(dot)com. Just fill in the rest of the address (writing it this way deters electronic spammers!). Can’t wait to see your project!
Well dear………I put it on backwards.LOL
Candy got stuck all on bowl……………
Gotta learn……huh?
Trish
Hi Trish! Make sure that you don’t overheat the candy – you want it to melt but not get too hot. Also, let the melted candy sit in the pan for a bit to cool some. It will be soft enough to form around a bowl but still firm enough to shape without sticking too much. Let me know how it goes!
Hi…making dish now…..Jolly Ranchers are very sticky….any ideas on
the stickiness………….?
SOOOOOOO Cool. Thank you
Thanks Trish! I want to make some more this season with other candies…so excited!
This is such a neat idea, these dishes look really cool. I will have to try this sometime. Thanks for the fun idea! Thanks for sharing at Showcase Your Talent Thursday. I hope to see you at the next party!
Thanks! I need to try this idea with some other candies and shapes : )
Love this! Thank you for posting and for bringing new, creative ideas to the project!
Jodi, Thanks for the original idea! It is fun – I can’t wait to make up more projects with my kids : )