Celebrate Christmas or any occasion with these fun gluten free cut out sugar cookies! Our cut out cookies are also dairy free, and you don’t have to chill the dough before cutting and baking, saving you time!

Christmas is almost here, and we’re so ready for it this year!
One of my favorite parts about the holiday season is baking cookies and making treats for loved ones. Giving things away, especially if it’s homemade, feels great I think.
We’ve had several sugar cookie recipes on our blog, but this is the first time I’ve done a cut out sugar cookie recipe! It’s really fun to decorate sugar cookies, so I wanted to make an allergy friendly cut out cookie that fits multiple food allergies.
These are fairly easy to make (no chilling the dough!) and they are great for any holiday or occasion. These aren’t just for Christmas!

We include some fun decorating ideas for other holidays in the post, along with our favorite frosting recipe to pipe designs.
We recently made a few changes to this recipe to make these cookies even easier to make! The new cookies are also softer, have a better taste and texture than our original cookies. If you still want the original recipe, we’ve included it in the post after the revised recipe card.
How to make gluten free cut out sugar cookies
Are you ready for some allergy friendly cut out sugar cookies? Let’s dive in!
No need to chill the dough!
We’ll start off with a note about not chilling this cookie dough since we love to save time in the kitchen 🙂
The biggest reason I love this cut out sugar cookie recipe is that it doesn’t require chilling the dough before cutting and cooking!

I can be an impatient cook sometimes, and when I was younger, I never really liked that some cookie dough had to be chilled for 2 hours before rolling, cutting, and baking. So I made these cut out cookies (and my other sugar cookie recipe) no chill for busy cooks who want to get their recipe made quickly.
This in itself is a time saver, plus I’ve found that these cookies are pretty easy to roll and cut thanks to the xanthan gum in the flour blend. So the dough doesn’t get overly sticky, making it much easier to roll, cut, and transfer the cookies.
If you want to chill the dough for some reason you are welcome to, but it won’t really change the recipe. I tried this recipe out with chilled dough as well to test it, and with the ingredients I used it didn’t change anything in the cookies.
Steps for making our gluten free cut out cookies
Our roll out cookies are pretty straight forward. Here are the steps for making these cookies.
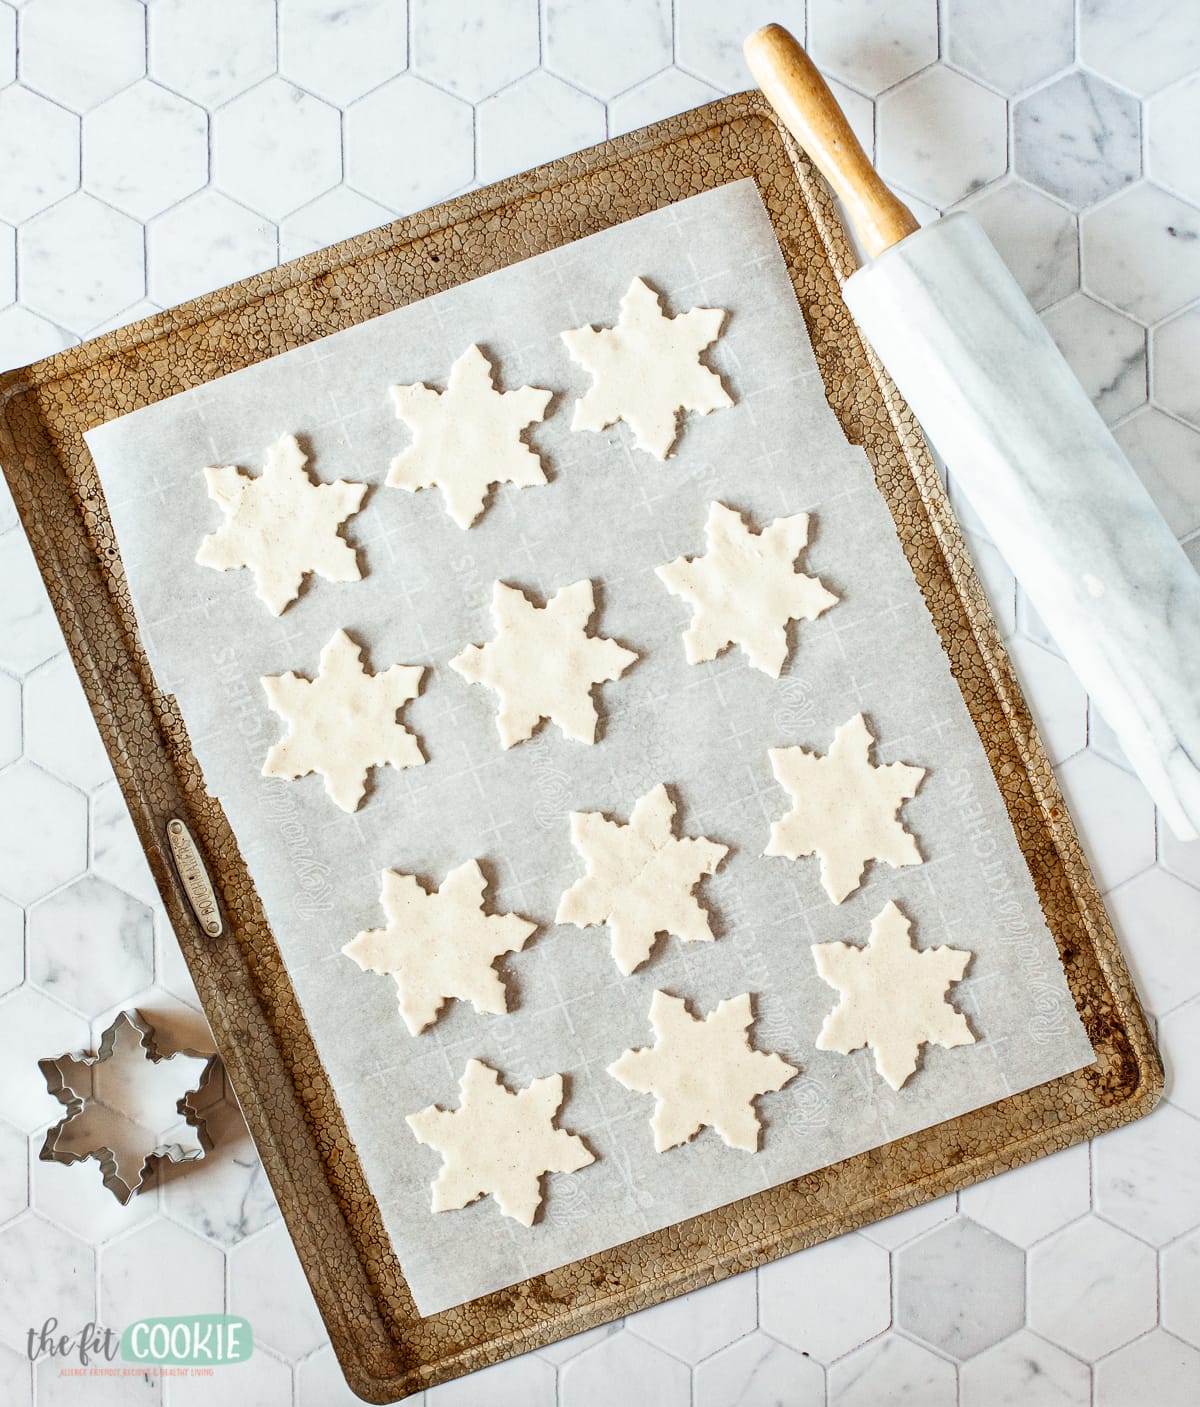
Don’t forget: the full recipe card is at the bottom of the post, this is just an overview of steps.
- Preheat oven to 350 degrees F and line a cookie sheet with parchment paper. Set aside.
- In a large bowl, cream together the dairy free butter, sugar, and vanilla.
- In a separate small bowl, whisk together the fine sorghum flour and the gluten free baking mix. If using all purpose gluten free flour rather than gluten free baking mix, whisk in 1/4 teaspoon salt and 1/4 teaspoon baking soda.
- Add half the flour to the butter blend and half the dairy free milk, using a hand mixer, mix until blended.
- Add the other half of the flour and the other half of the dairy free milk and mix until a thick dough forms. The dough should have the look and feel of playdough. It should not be dry/crumbly or sticky, it should be easily pressed together into a ball, and easily rolled out and cut into shapes.
- If the dough seems dry at all, add 1 tablespoon of dairy free milk. If the dough seems sticky, add 1 Tablespoon of gluten free baking mix.
- Divide the dough into 2 portions. Wrap the other portion of dough in plastic wrap to keep it from drying out while you roll out your dough.
- Lightly dust the counter or pastry mat with the gluten free baking mix or sorghum flour (both will work), and roll the dough portion out until it’s between 1/8 inch and 1/4 inch thick. The thicker the cookie, the softer it will be. These do well even thicker than 1/4 inch, however they may need baked slightly longer.
- Gather together the dough scraps, press into another dough ball, and roll out again until the dough is used up.
- Bake the cookies for 8 minutes for thinner cookies or small shapes, or 10-12 minutes for thicker (1/4 inch or thicker) or bigger shapes.
- Allow cookies to cool on the baking sheet for about 10 minutes then remove to a wire rack to cool completely.
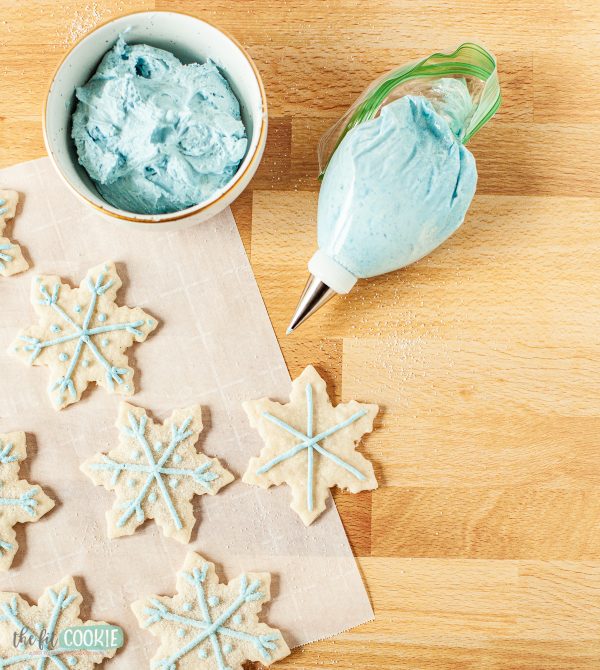
- Once your cookies are completely cooled, frost and decorate them.

Note that the Country Crock plant butter sticks don’t have soybean oil in them but the tubs do have soybean oil in them. Check the labels on those before you buy them if you have a soy allergy.
We only used the Country Crock plant butter sticks in this recipe, but haven’t tested this out with any other types of dairy free butter. So I am not sure how well this recipe will work out with different brands of dairy free butter at this time, but we’ll update the post when we try this recipe out with other brands.
We used our dairy free buttercream frosting for the snowflake cookies and the Valentine’s Day cookies with a bit of natural powdered food coloring from McCormick. The blue turned out pretty! It has a teal cast to it, which worked beautifully.
Update: sadly, the McCormick natural food color powders are discontinued. I’m trying out some other brands of natural food colors to see which ones work well for baking.
A note on gluten free flours and substitutions
When I originally created this cookie recipe, the recipe was a bit touchy and wasn’t as easy to swap between gluten free flour brands. With our newer recipe version, there is more flexibility with changing between similar gluten free flours, such as Bob’s Red Mill and King Arthur Flour.
If you swap flours and find that it does affect your moisture level in the dough somehow and it looks a bit dry, you can add a little more dairy free milk 1 teaspoon or 1 tablespoon at a time until it has the texture and similar moisture as new Playdough.
This dough should not be too sticky or too dry, just like a new pack of Playdough. Easy to roll and cut.
Conversely, if your dough seems a little too moist or is sticking too much, add a little bit more gluten free flour blend or baking mix to it 1 tablespoon at a time until it reaches the correct texture described above.
Our revised sugar cookie recipe is going to be a lot more flexible than our old recipe, however I still recommend using the ingredients we recommend for the best outcome: the King Arthur Flour gluten free baking mix or the Bob’s Red Mill gluten free flour, and the Country Crock Plant Butter sticks for the best outcome.

Xanthan gum
I used a gluten free all purpose baking mix for this recipe that has xanthan gum in it, as well as salt and baking soda (we used the King Arthur gluten free baking mix in this recipe).
If you’re using a gluten free flour that doesn’t include xanthan gum, add about 1/16 to 1/8 teaspoon xanthin gum to your flour or these cookies won’t hold together.
The xanthan gum in these cookies acts as a binder instead of the eggs or gluten in regular cut out cookies. So you want to make sure that your gluten free flour has it, or add a little bit of xanthan gum to these if your flour blend doesn’t include it.
Gluten free baking mix vs. gluten free flour
We used the King Arthur gluten free baking mix in this recipe, which has salt and baking soda in it already. So if you noticed those things missing from the ingredients in the recipe, that’s because our mix already had them.
If you use a gluten free flour blend that doesn’t have salt or baking soda in it already, add 1/4 teaspoon of each to the recipe (we added notes about this in the printable recipe card as well!).
How to make these allergy friendly cookies crispy
With our updated recipe, these sugar cookies are soft in the middle when made as written. I love softer cookies, but my husband loves crispy cookies, so here are some tips for making these cookies crispy if you want.
- Slightly increase the recommended baking time by about 2-4 minutes for crispy cookies. 2 minutes increase for thinner cookies, and 4 minutes increase for thicker cookies.
- Rolling the cookies thinner will result in a crispier cookie overall at the slightly increased baking times recommended above.
- You can also leave the cookies out on the cooling rack for several hours longer or overnight before storing in an airtight container for a really crisp cookie.
Personally I found the perfect texture for me was a cookie rolled out to a bit less than 1/4 inch and baked for 8-10 minutes. This had the perfect softness and chewiness in the middle with crisp edges.
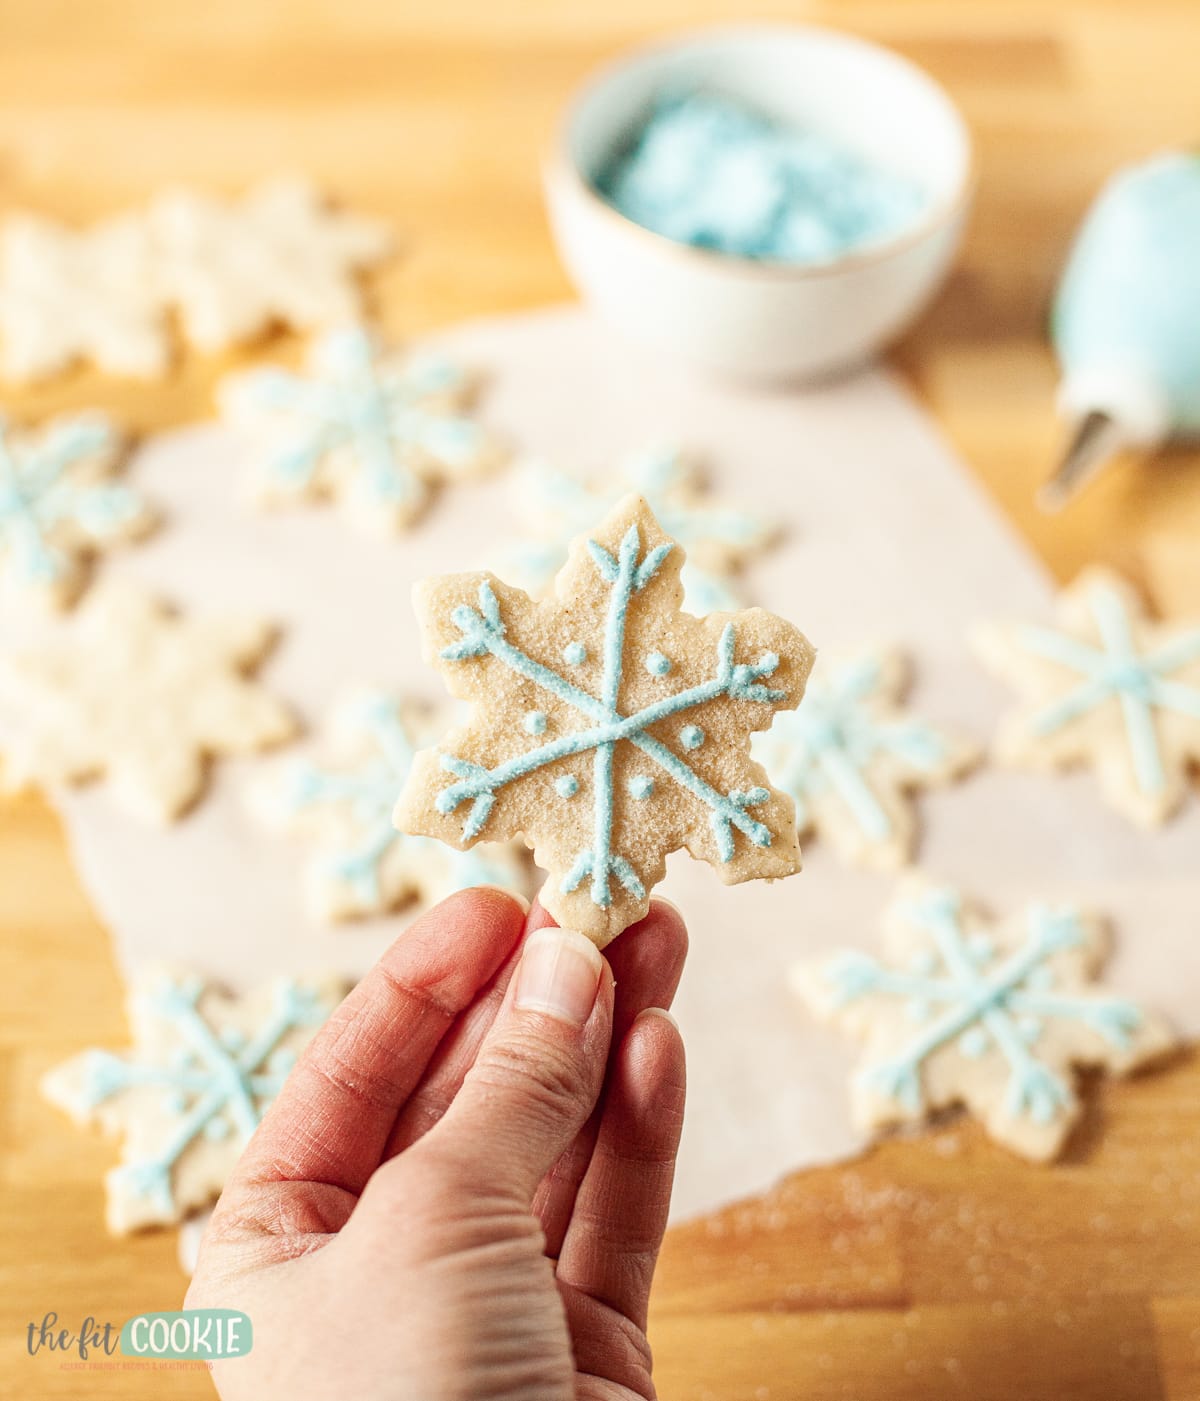
Ways to decorate our cut out sugar cookies
We show Christmas cut out cookies in the photos, but this recipe is great for any occasion or holiday, not just Christmas!
Here are some other decorating ideas for these gluten free cookies:
- Use champagne glass cookie cutters to make cute New Years Eve cookies.
- Cut these cookies out into hearts and decorate with red or pink icing for Valentine’s Day.
- Cut these roll out cookies into egg shapes and decorate them for Easter to look like dyed eggs (marbled icing would be so fun on them!).
- Use flag shaped cookie cutters and decorate them into American flags for the 4th of July. Or use a USA map cookie cutter!
- Cut the cookies into half moon shapes and decorate like watermelon slices for summer. I think pineapple shaped cookies would be fun for summer as well!
- Cut our cookies into pumpkins for fall or Halloween and decorate with orange icing and halloween sprinkles.
- If you’re celebrating Hanukkah, cut your cookies into a star of David or dreidel.
There are so many fun possibilities with these cookies! The Anne Clark shop has a ton of really fun cookie cutter shapes, including states. And their cookie cutters are made in the USA!

For these cookies, we used our allergy friendly buttercream frosting recipe and added some natural food coloring powder for the colors!
Notes on our revised sugar cookie recipe
A couple months ago, we were working on experimenting with some of our cookie recipes to make them even softer with a better texture, starting with our chocolate chip cookies.
We made a few tweaks to the recipe, mixed 2 different kinds of flour, and made our cranberry white chocolate chip cookies and the result is soft inside and crisp on the edges, the perfect texture for cookies in my opinion!
I decided to take the same concept and apply it to our gingerbread cut out cookies as a variation of this cut out sugar cookie recipe and I loved the texture and softness from combining the 2 flours.
Since there were some parts of this recipe that I didn’t like but originally wasn’t sure how to fix after testing so many batches, I decided to revisit this roll out sugar cookie recipe and try out the combination of flours to see how it worked.
The revised recipe turned out amazing!
I went ahead and updated the recipe card to have the new recipe. The tweaks aren’t huge, but our revised sugar cookie recipe is softer, has a better texture and taste, and is much easier to make (and is less temperamental) than the original recipe!
We even used this updated recipe to make a cute Valentine’s sugar cookie house using our gingerbread house template. It worked great and was sturdy for the house pieces, we just baked them a bit longer so they weren’t soft anymore.
Enjoy!
UPDATE on the King Arthur all-purpose gluten free baking mix
We have used the King Arthur all-purpose gluten free baking mix for quite a few of our recipes, King Arthur Baking Company recently reformulated their gluten free baking mix to be better for biscuits.
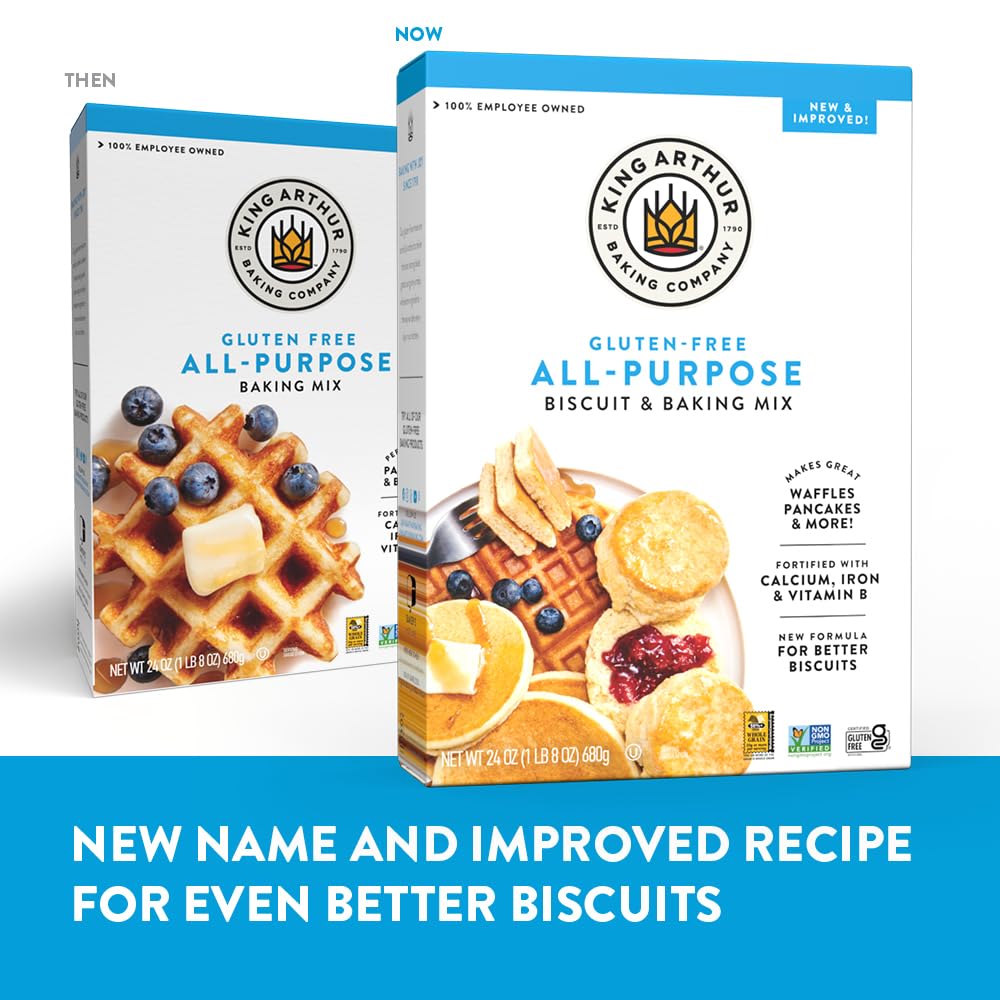
The change in their baking mix results in slight texture changes for our cookies specifically, but our cookie recipes still work with the newly reformulated King Arthur gluten free all-purpose baking mix.
I am testing several of our recipes with the changed flour to make sure that the recipes still work great and if any updates to our recipes will be necessary. So far no changes to the recipes are necessary with what we have been testing, but we’ll update recipe cards if we find changes that need to be made!

No Chill Gluten Free Cut Out Sugar Cookies (Dairy Free)
Ingredients
Roll Out Sugar Cookies:
- ½ cup + 1 Tablespoon Country Crock plant butter sticks, softened/room temperature (I do not recommend using Earth Balance butter in this recipe since it is usually too soft and liquid at room temperature and will cause the cookies to spread too much).
- 1 cup granulated sugar
- 2 teaspoons vanilla extract
- 1 ½ cup Authentic Foods superfine sorghum flour
- ¾ cup King Arthur gluten free all-purpose baking mix
- ¼ cup dairy free milk of choice (oat, almond, rice, etc.)
- ¼ teaspoon salt (omit salt if your GF flour blend already as salt in it)
- Dairy Free Buttercream Frosting
Instructions
- Preheat oven to 350 degrees F and line a cookie sheet with parchment paper. Set aside.
- In a large bowl, cream together the dairy free butter, sugar, and vanilla.
- In a separate small bowl, whisk together the fine sorghum flour and the gluten free baking mix. If using all purpose gluten free flour rather than gluten free baking mix, whisk in 1/4 teaspoon salt and 1/4 teaspoon baking soda.
- Add half the flour to the butter blend and half the dairy free milk, using a hand mixer, mix until blended.
- Add the other half of the flour and the other half of the dairy free milk and mix until a thick dough forms. The dough should have the look and feel of playdough. It should not be dry/crumbly or sticky, it should be easily pressed together into a ball, and easily rolled out and cut into shapes.
- If the dough seems dry at all, add 1 tablespoon of dairy free milk. If the dough seems sticky, add 1 Tablespoon of gluten free baking mix.
- Divide the dough into 2 portions. Wrap the other portion of dough in plastic wrap to keep it from drying out while you roll out your dough.
- Lightly dust the counter or pastry mat with the gluten free baking mix or sorghum flour (both will work), and roll the dough portion out until it's between 1/8 inch and 1/4 inch thick. The thicker the cookie, the softer it will be. These do well even thicker than 1/4 inch, however they may need baked slightly longer.
- Gather together the dough scraps, press into another dough ball, and roll out again until the dough is used up.
- Bake the cookies for 8 minutes for thinner cookies or small shapes, or 10-12 minutes for thicker (1/4 inch or thicker) or bigger shapes.
- Allow cookies to cool on the baking sheet for about 10 minutes then remove to a wire rack to cool completely.
- Once your cookies are completely cooled, frost and decorate them.
Video
Notes
Nutrition
The original recipe for our gluten free cut out sugar cookies
Ingredients:
- 1/2 cup Country Crock plant butter sticks, softened and room temperature (1/2 cup = 1 stick)*
- 1 cup granulated sugar
- 2 Tablespoons rice milk (or oat, almond, or coconut milk)
- 2 teaspoons vanilla extract
- 2-1/2 cups + 1 Tablespoon Bob’s Red Mill 1-to-1 gluten free blend** (or King Arthur all purpose gluten free flour, if you use the KAF flour you’ll need 1-2 additional teaspoons of dairy free milk)
- 1/2 teaspoon salt (omit salt if your GF flour blend already as salt in it)
- 1/2 teaspoon baking powder
Instructions
- Preheat oven to 350 degrees F and line 2 cookie sheets with parchment paper. Set aside.
- In a large bowl, cream together the dairy free butter, sugar, rice milk, and vanilla.
- Add half the flour and the salt and baking powder and mix again until smooth.
- Add the other half of the flour and mix until a crumbly looking dough forms. The dough will look crumbly at first, but should be easy to press together to make a smooth and firm dough.
- Divide the dough into 2 to 4 portions depending on how much dough you want to roll out at once. I prefer rolling out smaller portions of dough to make it easier to get uniform thickness, so I divide it into 4 portions. Wrap the remaining portions of dough in plastic wrap.
- Lightly dust the counter or pastry mat with gluten free flour and roll the dough portion out until it’s about 1/8 inch thick or slightly less. I roll my dough out to slightly less than 1/8th inch. Cut out your shapes with cookie cutters and place on the prepared cookie sheets.
- Gather together the dough scraps, press into another dough ball, and roll out again. You can do this about 2 times before the dough begins to get too dry.
- Bake the cookies for 6-8 minutes: 6 minutes for softer cookies, 7-8 minutes for crispier cookies.
- Allow cookies to cool on the baking sheet for about 5-10 minutes then remove to a wire rack to cool completely.
- Once your cookies are completely cooled, you can ice them.
Cooking times for crispy vs. soft cookies:
- Rolled thicker (between 1/8 to 1/4 inch) = bake 7-8 minutes, soft cookie
- Rolled thin (1/8 inch or less) = bake 6 minutes, soft cookie
- Rolled thin = bake 7-8 minutes, crispy cookie

Sarah Jane Parker is the founder, recipe creator, and photographer behind The Fit Cookie which she founded in 2011. Sarah is based in Wyoming and has been managing food allergies for herself and her 2 children for over 20 years. Sarah was also a certified personal trainer for 12 years, as well as a group fitness instructor, health coach, running coach, and fitness nutrition specialist.
I wanted to leave a more positive review of your recipe because it is my go-to when I want to make cookies. Do I have to occasionally tweak a few things here and there? Sure, but I think that’s the nature of cooking allergen-free in general.
Question: Have you tried freezing this dough? I have at least three different batches of cookies I need to make between now and Christmas, and I’m considering just making a bunch of dough, separating it, and freezing.
Thank you so much Christina! I haven’t tried freezing this dough yet, I think it would freeze well but I don’t know for sure. I can try freezing a batch to see how it goes. If you try freezing some, let me know how it goes and either me or you can report back and see how it went 🙂
Followed directions/measurements precisely, used the Bob’s Red Mill 1-1 flour but used Earth Balance soy free vegan butter. The mixture was far too crumbly to form into a rollable dough, so I added an additional tbs of oat milk and an egg for binding the ingredients. Rolling it was still very difficult, but the cookies were salvageable. Too much hassle getting the dough to form to use this recipe again, though.
Sorry you experienced this Alayna! It’s possible it was because the dairy free butter was different than the one specified. I’ll have to try using the Earth Balance soy free butter in this recipe and do some testing to see what adjustments need to be made.
With the amount of flour it called for, I had to use much much more ‘milk’ substitute than what the recipe calls for. I also find that they taste quite doughy. Thank you for a starting base but I won’t be using this recipe again 🙁
Hi Carly, what brand of gluten free all purpose flour did you use? I’ve found that each brand of flour absorbs the dairy free milk differently, and I added notes about that in the post. For the best results I’d use the Bob’s Red Mill one to one flour in this recipe, we tested this recipe out about 8-10 times with that flour and it worked great. The dough is supposed to look crumbly at first but should press together into a smooth dough. I suspect it might be the brand of flour blend you’re using. Please let me know what kind you used so I can test it out and add a note to the recipe to avoid that brand.